Jump Flooding Algorithm
昨日
本記事は Unity #2 Advent Calendar 2021 の 20日目 の記事です。
前日の記事は @hecomi さん の「Unity で自作ライブラリの Package Manager / Scoped Registry 対応をしてみた」です!
qiita.com
UPMでインポートできるパッケージが1つあるのですが、UPM上にバージョンを表示させる方法を知らなかったので、後程じっくり読みたいと思います!(タグではなくブランチでやるということなのでしょうか?GithubActionの中身も気になる…!)
はじめに
本記事では、Jump Flooding Algorithmを使ったゲームの実装について簡単にまとめてみました。
地形(2D)との距離を使って衝突判定を行うことで、複雑な地形との衝突判定や、
パーティクル等の多量オブジェクトの衝突判定を簡易的に実装していきます。
(大変恐縮ですが、時間の都合等で実装がかなり荒く雑で汚い状況になっています)
目次
Jump Flooding Algorithm(以下、JFA)
Jump Flooding Algorithmとは、GPUを使って効率よくボロノイ図を作成する手法です。
ボロノイ図とは、平面上に配置された複数個の点(母点)に対して、どの母点が近いかによって領域分けされた図のことです。
ja.wikipedia.org
Flooding Algorithmは情報を分配するアルゴリズム全般を指すようなので、
直訳すると「ジャンプする情報の分配アルゴリズム」になります。
ここで分配する情報とは、ずばり一番近い母点の座標になりますが、
特殊な(=ジャンプする)分配方法によって、うまいこと領域分けするための陣取り合戦がされるようになっています。
今回の完成図

完成品もあるので興味のある方はご覧ください。
github.com
Jump Flooding Algorithmの考え方
こちらの動画が大変参考になりました。
www.youtube.com
マナー違反かもしれませんが、こちらの動画の資料を使って解説していきます。
(資料を準備する時間がありませんでした… Benjamin Douglasさんに感謝)
塗りつぶし(分配)パターンについて
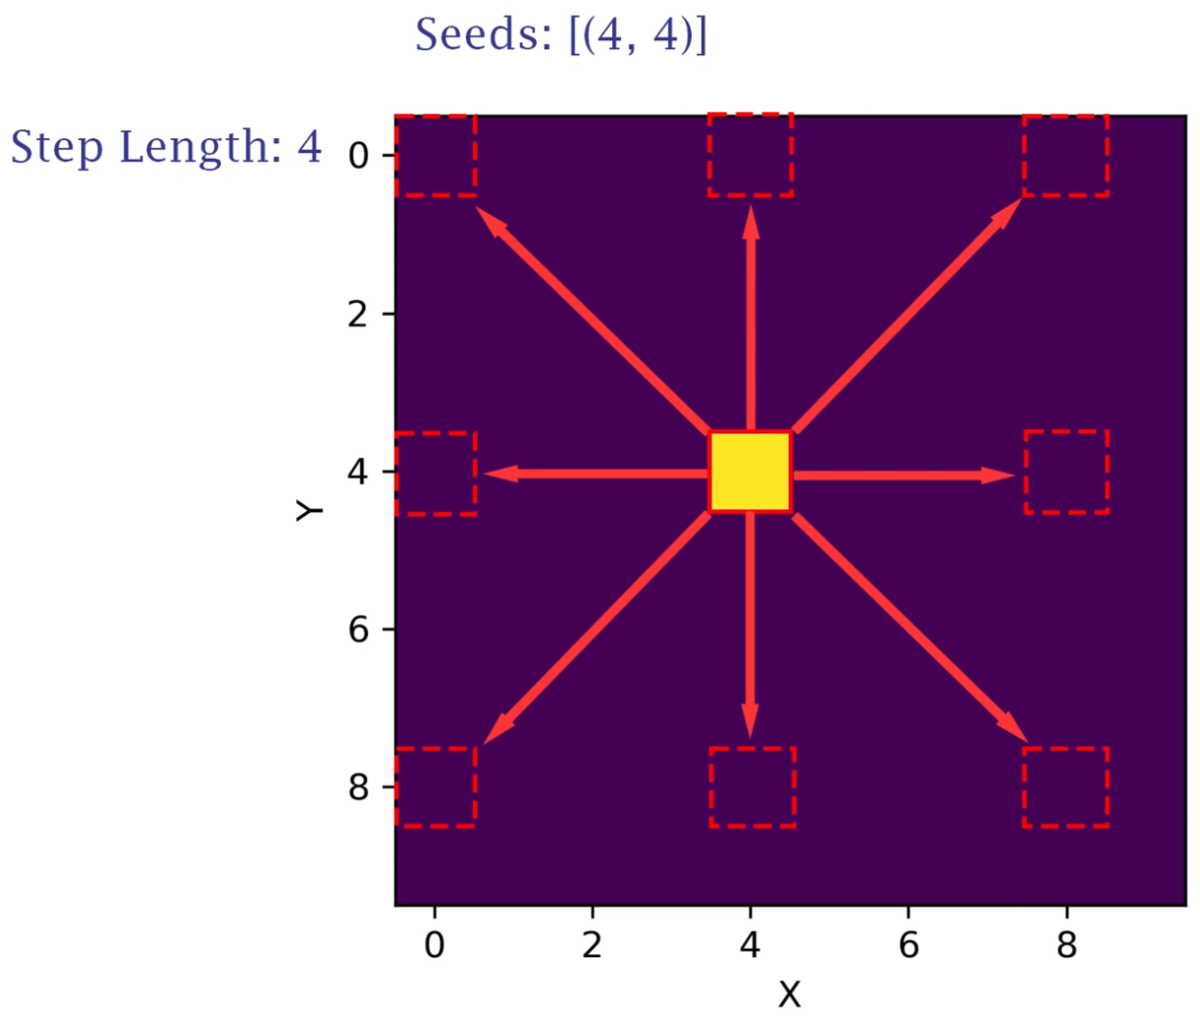
母点(Seed)の座標から一定距離(Step Length)離れた座標に対して情報を分配していきます。
この資料では 4 離れた座標の8カ所が分配先の対象になります。
母点が(4, 4)にひとつあるので、この座標のXとYがそれぞれ 4 離れた場所が赤線の箇所です。

8カ所に分配しました。これで1回目は終了です。
次は距離(Step Length)を 2 にして、同じように分配を繰り返していきます。
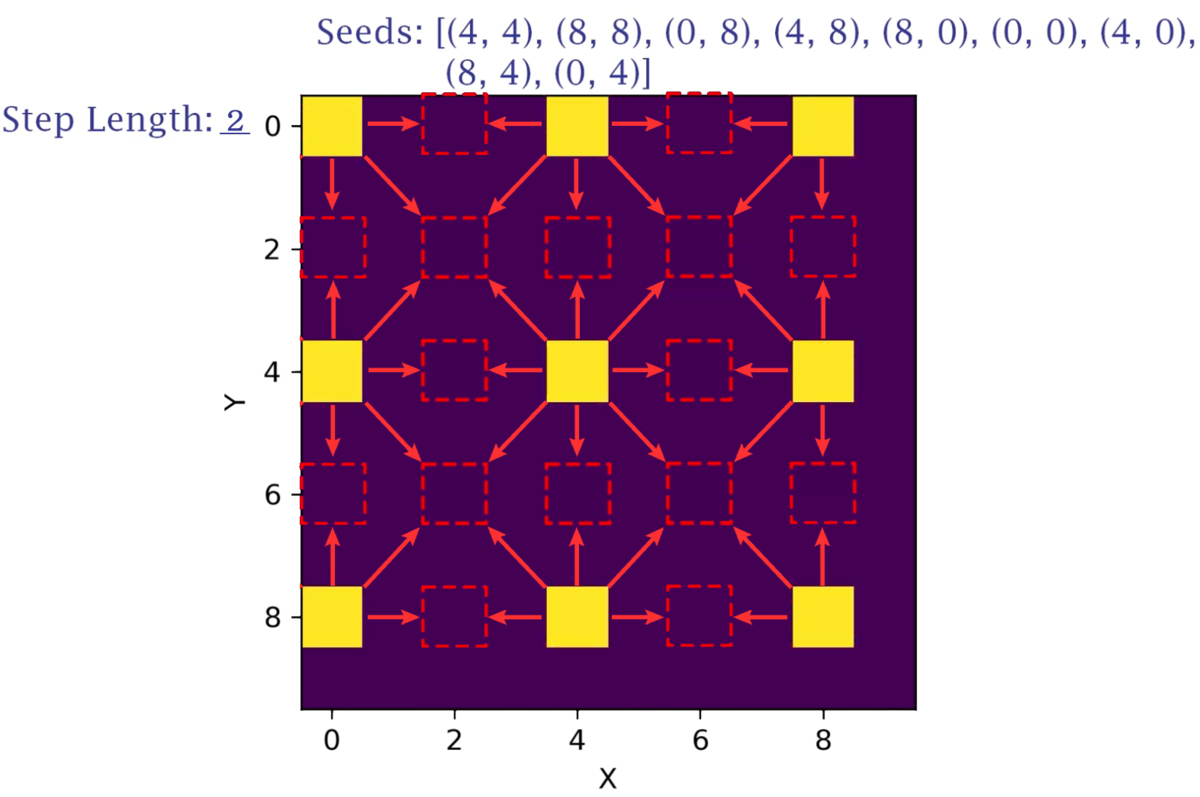
1回目で分配された箇所は、2回目では母点となります。
1回目と合わせて母点(Seed)が9カ所となったので、それぞれの座標から 2 離れた座標の8カ所が分配対象となります。
ただし、テクスチャの範囲外に出てしまった箇所に関しては考慮しなくて良いので、資料では16か所です。
次は距離(Step Length)を 1 にして、また分配を繰り返していきます。
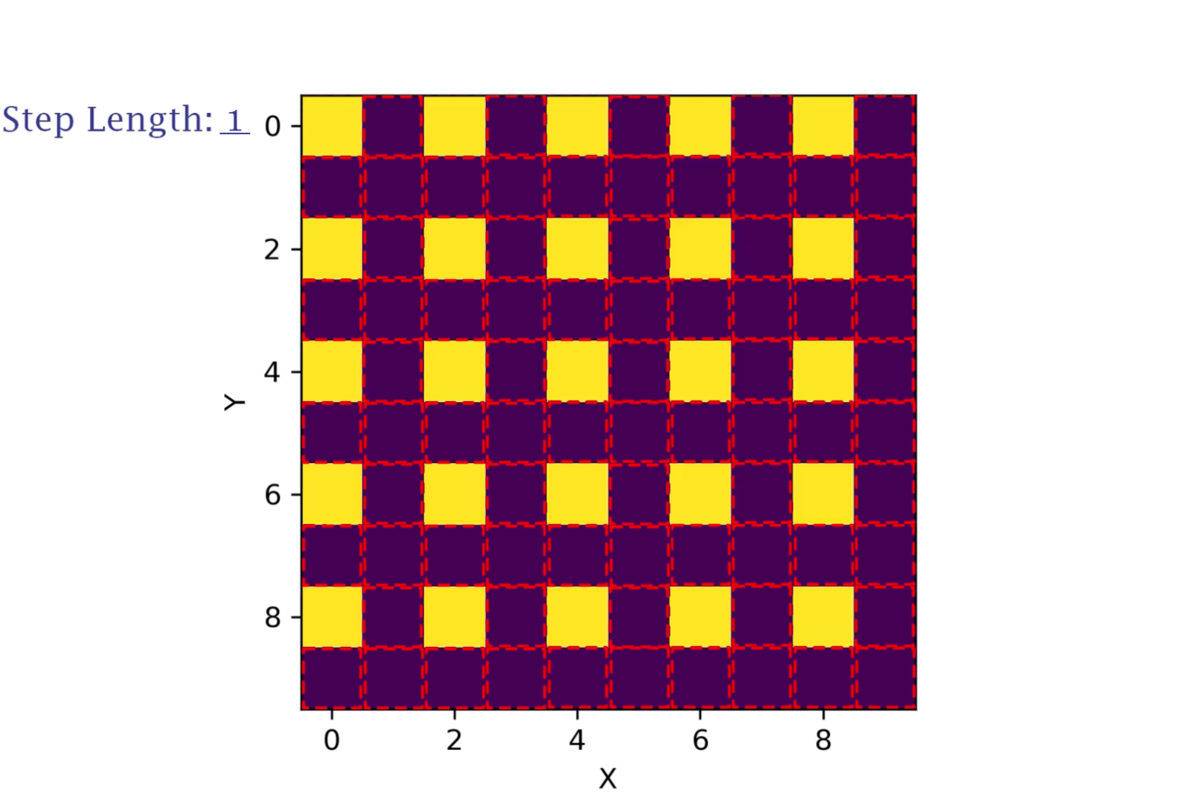
前回同様、2回目で分配された箇所は、3回目で母点となります。
2回目と合わせて母点(Seed)が25カ所となったので、それぞれの座標から 1 離れた座標の8カ所が分配対象となります。
Step Lengthが 1 になると同時に、全箇所に分配されたことが分かります。
この様な手順で塗りつぶし(情報分配)していきます。
Jump Flooding Algorithmと名付けられた所以が分かった気がします!
分配の優先度について
2回目、3回目の時に、それぞれの母点が同じ箇所に対して分配している箇所がいくつかありました。
上記の資料では、元々同じ母点(Seed)から分配された情報なので、
どちらの母点の情報を分配するか考慮する必要がありませんでしたが、実際は必要になります。
その優先度は次のようにして決まります。

この資料は動画内で紹介されていたフロー図を日本語訳したものです。
先程の赤枠のような箇所をイメージしながらフロー図を進めてください。
注目は最初のYes/No分岐点から始まります。
この点は既に現在の母点の情報と同じ?
塗りつぶしする処理順によって、既に母点情報が分配されている可能性があります。
その際、この点が持っている母点情報は、上塗りする母点情報と同じかどうか比較します。
同じなら何もする必要がありません。
この点は空き?
塗りつぶしする処理順によって、まだ母点情報が分配されていない可能性もあります。
その際、この点はなにも情報を持っていないので、上書きします。
Jump Flooding Algorithmの実装
それではUnityで実装してきます。
下準備
今回作るゲームでは、地形情報(マップ)を母点にJFAで距離情報を作成し、
その距離を使って衝突判定をしていきます。
なので、まずはマップを用意します。

次に、下記を目的としたRenderTextureを用意します。
| ファイル名 | 略称 | 用途 |
|---|---|---|
| JumpFloodingInputRT | InputRT | 地形情報(マップ)変形用 |
| JumpFloodingOutputRT | OutputRT | JFAによる出力結果(ボロノイ図) |
| JumpFloodingOutputNormalRT | OutputNormalRT | JFAによる出力結果から算出した法線情報 |
最後に、先程用意したマップをInputRTの初期値として開始時に書き込みます。
MapManager.csを作成して次のように処理します。
using UnityEngine;

public class MapManager : MonoBehaviour
{
    private static MapManager instance;

    [SerializeField]
    private Texture initializeTexture = default;

    [SerializeField]
    private RenderTexture targetRenderTexture = default;

    private void Awake()
    {
        if (instance == null)
        {
            instance = this;
            Graphics.Blit(initializeTexture, targetRenderTexture); // 初期値書き込み
        }
        else
        {
            DestroyImmediate(this.gameObject);
        }
    }

    private void OnDestroy()
    {
        if (instance == this)
            instance = null;
    }
}
これによりゲーム開始時に、
Graphics.Blit関数を使って先程のアリの巣みたいなマップがInputRTに書き込みされます。
これでは準備は整いました!
実装(C#)
それではJFAの実装をしていきましょう!
まず、JumpFloodingManager.csを作成して次のような実装をします。
using UnityEngine;
using UnityEngine.Rendering;

public class JumpFloodingManager : MonoBehaviour
{
    private static JumpFloodingManager instance;
    private static readonly int RT0 = Shader.PropertyToID("temp0");
    private static readonly int RT1 = Shader.PropertyToID("temp1");
    private static readonly int ShaderParam_StepLength = Shader.PropertyToID("_StepLength");

    [SerializeField]
    private Camera targetCamera;

    [SerializeField]
    private RenderTexture inputRenderTexture;

    [SerializeField]
    private RenderTexture outputRenderTexture;

    [SerializeField]
    private RenderTexture outputNormalRenderTexture;

    [SerializeField]
    private Material material;

    private void Awake()
    {
        if (instance == null)
            instance = this;
        else
            DestroyImmediate(this.gameObject);
    }

    private void OnDestroy()
    {
        if (instance == this)
                instance = null;
    }

    private void Start()
    {
        int height = outputRenderTexture.height;
        int width = outputRenderTexture.width;

        var commandBuffer = new CommandBuffer();

        // ①
        commandBuffer.GetTemporaryRT(RT0, width, height, 0, FilterMode.Bilinear, RenderTextureFormat.ARGBFloat);
        commandBuffer.GetTemporaryRT(RT1, width, height, 0, FilterMode.Bilinear, RenderTextureFormat.ARGBFloat);

        // ②
        commandBuffer.Blit(inputRenderTexture, RT0, this.material, 0);

        // ③
        int[] rtArray = { RT0, RT1 };
        int rtCount = rtArray.Length;
        const int JumpCount = 8;
        for (int i = 0; i < JumpCount; ++i)
        {
            float stepLength = Mathf.Clamp(Mathf.Pow(2.0f, (JumpCount - i) - 1), 1f, 1024f);
            commandBuffer.SetGlobalFloat(ShaderParam_StepLength, stepLength);
            commandBuffer.Blit(rtArray[i % rtCount], rtArray[(i + 1) % rtCount], this.material, 1);
        }

        // ④
        commandBuffer.Blit(rtArray[JumpCount % rtCount], outputRenderTexture);
        commandBuffer.Blit(outputRenderTexture, outputNormalRenderTexture, this.material, 2);
        commandBuffer.ReleaseTemporaryRT(RT0);
        commandBuffer.ReleaseTemporaryRT(RT1);

        // ⑤
        this.targetCamera.AddCommandBuffer(CameraEvent.BeforeDepthTexture, commandBuffer); // For Forward
        this.targetCamera.AddCommandBuffer(CameraEvent.BeforeGBuffer, commandBuffer);      // For Deferred
    }
CommandBufferを使って、カメラの(Built-inの)レンダリングパイプラインにJFAのアルゴリズムを差し込んでいます。
コメントで番号(①~⑤)を割り振ったので、順番に解説していきます。
①について
GetTemporaryRT関数を用いて、一時的なRenderTextureを作成しています。
作成されたRenderTextureはRT0とRT1でハンドリングしていきます。
このRT0とRT1を使って、JFAの分配処理を実装していきます。
②について
Blit関数を用いて、inputRenderTextureからRT0に書き込んでいきますが、
materialの0 passを使って書き込んでいきます。
まだシェーダーについて解説していないのですが、
ここで、ソーベルフィルタを使ってエッジを抽出し、
母点情報(UV情報)をR値G値に書き込みます。
③について
JFAの分配を行っています。
先程の資料ではStepLengthは4,2,1という数値でしたが、これだと回数が足りない為、
JumpCountの回数に合わせて256,128,64,32,16,8,4,2,1とMathf.Powを使って調整しています。
この数値をSetGlobalFloat関数を用いて、マテリアルに値を渡しています。
そしてBlit関数を使って、シェーダー内で分配していきます。
④について
RT0かRT1にJFAの結果が残るので、outputRenderTextureにコピーします。
その後、outputRenderTextureの情報を使ってoutputNormalRenderTextureに法線情報を書き込んでいきます。
RT0とRT1はもう不要なのでReleaseTemporaryRTで解放します。
(毎フレーム使うので完全な開放ではないとは思います。使用権の放棄くらいに想像しています)
⑤について
以上の差込処理をカメラのレンダリングパイプラインに挿入していきます。
Forwardであれば、CameraEvent.BeforeDepthTexture、
Deferredであれば、CameraEvent.BeforeGBufferに差し込むと良さそうですが、
急ぎの実装だったのでどちらにも差し込んでいます。
今のところ2重に処理されるということは見られないので、
このままで良さそうな気もするしダメそうな気もする。
実装(Shader)
つづいてシェーダーの実装をしていきます。
JumpFloodingAlgorithm.shaderを作成し、次のように実装します。
全てのコードを載せるとシンドイので、パスの部分だけ抜粋します。
共通部分の appdata と v2f の構造体の中身は、float4 vertexとfloat2 uvのみのシンプルなものです。
0 pass:エッジ抽出&母点情報の書き込み(②に対応)
Pass
{
    Name "0pass : Convert To Seed"

    CGPROGRAM
    float4 frag (v2f i) : SV_Target
    {
        float4 color = tex2D(_MainTex, i.uv);
        float valid = step(1e-3, color.a * (color.x + color.y))0; // A値 * (R値 + G値)が0.0を超える数値なら衝突物として扱う

        float3x3 sobelFilter = float3x3(-1, -2, -1, 0, 0, 0, 1, 2, 1);
        float2 sobel = float2(0.0, 0.0);

        for (int x = -1; x <= 1; x++)
        {
            for (int y = -1; y <= 1; y++)
            {
                float c = tex2D(_MainTex, i.uv + float2(x, y) * _MainTex_TexelSize.xy).r;
                sobel.x += c * sobelFilter[x + 1][y + 1];
                sobel.y += c * sobelFilter[y + 1][x + 1];
            }
        }

        float edge = step(1e-3, max(abs(sobel.x), abs(sobel.y)));
        return float4(edge * i.uv, 0.0, valid); // 母点情報(UV値)にして出力
    }
    ENDCG
}
ソーベルフィルタとは、エッジを抽出するフィルタですが、
今回のテーマとは関係があまりないので、詳しくは割愛いたします。
重要なポイントは、
不透明の色がついている箇所を母点を判断して、
母点情報(UV値)に置き換えて出力しているところになります。
この母点を最初のSeedとして、周囲に分配していきます。
A値には、衝突物として扱ったかどうかの判定を入れています。
これは衝突物の内側か外側かを判定するために使用します。
1 pass:エッジ抽出&母点情報の書き込み(③に対応)
Pass
{
    Name "1pass : Jump Flooding Algorythm (Multiple Passes)"

    CGPROGRAM
    float _StepLength;

    float3 jumpFlooding_Compare(float2 seed, float2 self, float2 currentSeed, float currentDist)
    {
        float dist = distance(seed, self);

        bool isEmpty = 0.0 == seed.x + seed.y;
        bool isFarther = currentDist < dist;

        if (isEmpty || isFarther)
            return float3(currentSeed, currentDist);
        else
            return float3(seed, dist);
    }

    float3 jumpFlooding(in float2 fragCoord, in sampler2D channel, in float2 onePixel, float stepLength)
    {
        float2 self = fragCoord;
        float3 data = float3(0.0, 0.0, 1e+5);

        for (int x = -1; x <= 1; x++)
        {
            for (int y = -1; y <= 1; y++)
            {
                float2 neighbor = self + float2(x, y) * onePixel * stepLength;
                float4 pointPosition = tex2D(channel, frac(neighbor));
                data = jumpFlooding_Compare(pointPosition.xy, self, data.xy, data.z);
            }
        }

        return data;
    }

    float4 frag (v2f i) : SV_Target
    {
        float3 data = jumpFlooding(i.uv, _MainTex, _MainTex_TexelSize.xy, _StepLength);
        return float4(data, tex2D(_MainTex, i.uv).a);
    }
    ENDCG
}
JFAで使用するパスです。先程の解説ではSeedを周囲に分配していくと解説しましたが、
GPUで処理する場合は、分配される側の視点で実装していく必要があります。
先程の資料でいうところの、赤枠側の視点のことです。
jumpFlooding関数からご覧ください。
selfは赤枠のUVが入ります。
dataは最終結果をいれるための変数で、XYは母点情報(母点のUV座標情報)、Zは母点との距離情報が入ります。
for文を使って、StepLength分 離れた座標の8カ所(自分を入れて9カ所)にある母点情報を確認しています。
どのように上書きするかは、先程お伝えした通り優先度が決まっています。
jumpFlooding_Compare関数をご覧ください。
母点情報があることを想定してdistで距離を計算します。
isEmpty は 比較対象に母点情報があるかどうかを判断しています。R値とG値が0だった場合は空っぽだと判定します。
isFather は 比較対象の母点との距離 が 現在値の母点との距離 より遠いかどうかを判定します。
比較対象について、情報が空っぽ あるいは 母点との距離が遠い 場合は何もせず、
それ以外の場合(情報があり、母点との距離が近い)場合は上書きします。
記事を書いている途中で気づきましたが、isEmptyは無くても問題なく動作します。
なぜなら、isEmptyがあってもなくても、距離が近い順で判断しているからです。
A値には、衝突物の側か外側を判定するための数値を入力しています。
衝突物の内側なら1.0、外側なら0,0が入力されています。
2 pass:法線情報の書き込み(④に対応)
Pass
{
    Name "2pass : Convert To Normal"

    CGPROGRAM
    float4 frag (v2f i) : SV_Target
    {
        float4 color = tex2D(_MainTex, i.uv);
        float2 seed = color.xy;
        float2 normal = normalize(i.uv - seed) * 0.5 + 0.5;
        return float4(normal, 0.0, 0.0);
    }
    ENDCG
}
法線情報を書き込むのに使用するパスです。
JFAによって各座標に一番近い母点情報(母点のUV座標情報)が入っているので、
母点のUV座標から各UV座標へ向くベクトルを作って正規化することで法線情報となります。
RenderTextureに出力する際は整数でなければダメでしたので、
‐1.0~1.0の数値を0.0~1.0に変換して、出力しています。
実装の確認
Window > Analysis > Frame Debuggerを使って、描画内容の確認をしていきます。
使用されいているRT、StepLengthの数値を確認しつつ、
問題なくJFAで距離情報が作られていることが分かります。
距離情報などを見える化しておきたいので、マップのマテリアルを
次のシェーダーに置き換えて、開発しやすくします。
fixed4 frag(v2f i) : SV_Target
{
    float dist = tex2D(_OutputTex, i.uv).b;    // RGに母点UV座標、Bに母点との距離情報
    float grad = dist * UNITY_PI * 60.0 - _Time.y * 10.0;
    float3 output = lerp(float3(1,1,1), cos(float3(0,2,4) + grad) * 0.15 + 0.8, step(0.001, dist));
    float3 outputNormal = saturate(tex2D(_OutputNormalTex, i.uv).rgb);

    fixed4 col = lerp(
        tex2D(_MainTex, i.uv),
        lerp(float4(output, 0.0), float4(outputNormal, 0.0), saturate(_Ratio - 1.0)),
        saturate(_Ratio)
    );

    return col;
}
_MainTexにアリの巣上のマップテクスチャ、
_OutputTexにoutputRT、
_OutputNormalTexにoutputNormalRTを設定して使います。
float _RatioをInspectorで調整して、確認作業を行っていきます。
テクスチャから情報を得る
プレイヤーの移動制御はC#側で行っていく予定なので、
RenderTextureからTexture2Dに情報を移して、色情報を取得できるようにします。
JumpFloodingManager.csに次のように追記していきます。
private Texture2D outputTexture = default;
private Texture2D outputNormalTexture = default;

private void Start()
{
    this.outputTexture = new Texture2D(
        this.outputRenderTexture.width,
        this.outputRenderTexture.height,
        TextureFormat.RGBA32, false, false);

    this.outputNormalTexture = new Texture2D(
        this.outputNormalRenderTexture.width,
        this.outputNormalRenderTexture.height,
        TextureFormat.RGBA32, false, false);
}

private void OnPostRender()
{
    var temp = RenderTexture.active;

    RenderTexture.active = this.outputRenderTexture;
    this.outputTexture.ReadPixels(new Rect(0, 0, this.outputTexture.width, this.outputTexture.height), 0, 0);

    RenderTexture.active = this.outputNormalRenderTexture;
    this.outputNormalTexture.ReadPixels(new Rect(0, 0, this.outputNormalTexture.width, this.outputNormalTexture.height), 0, 0);

    RenderTexture.active = temp;
}
OnPostRender関数は、このコンポーネントをカメラに対しアタッチすることで、
カメラのレンダーパイプラインの最後に呼び出されます。
この中の実装によってRenderTextureの中身をTexture2Dに移していますが、
めちゃくちゃ重いので参考にしないでください。この処理のせいで30FPSくらいに落ちてます
(恐らく1024x1024の色を全取得しているのが原因)
今回は高速化はテーマじゃないので(といいますか時間がないので)、そのあたりは取り扱いません。
これでひとまず、C#側でも色情報が取得できる状態となりましたので、
続けて、JumpFloodingManagerにGet関数を実装していきます。
public static void Get(Vector2 uv, out Vector2 point, out Vector2 normal, out float distance)
{
    point = normal = Vector2.zero;
    distance = 0f;

    if (instance == null)
        return;

    uv.x = Mathf.Clamp01(uv.x);
    uv.y = Mathf.Clamp01(uv.y);

    var color = Color.clear;

    color = instance.outputTexture.GetPixelBilinear(uv.x, uv.y, 0);
    point = new Vector2(color.r, color.g);

    //distance = color.b * -(color.a * 2f - 1f); // color.bは精度が低かったので再計算する
    distance = Vector2.Distance(uv, point) * -(color.a * 2f - 1f);

    color = instance.outputNormalTexture.GetPixelBilinear(uv.x, uv.y, 0);
    normal = new Vector2(color.r * 2.0f - 1.0f, color.g * 2.0f - 1.0f);
    normal.Normalize();
    normal *= Mathf.Sign(distance);
}
引数で指定したUV座標の、最も近い母点のUV座標、法線、距離を返す関数です。
distanceはB値に入っているのですが、精度があまりよろしくなかったので、
引数で指定したUV座標と母点のUV座標との距離をC#上で算出しています。
‐(color.a * 2f - 1f)は、衝突物の内側なら-1.0、外側なら1.0になるよう符号を調整しています。
法線情報はシェーダー内で、-1.0~1.0を0.0~1.0に加工して保存していたので、
C#で取り出す場合はcolor * 2f - 1fとすることで元に戻しています。
プレイヤーを動かす
衝突判定の準備が整ったので、プレイヤーを作成していきます。
PlayerCtrl.csを作成し、次のように実装していきます。
using UnityEngine;

public class PlayerCtrl : MonoBehaviour
{
    [SerializeField]
    private float movePower = 100.0f;

    [SerializeField]
    private float jumpPower = 500.0f;

    [SerializeField]
    private float radius = 5f;

    private Vector3 velocity = default;

    private void Update()
    {
        this.velocity.x -= Mathf.Sign(this.velocity.x) * 0.2f; // 適当な減衰
        this.velocity.y -= 9.81f * 0.5f * Time.deltaTime * Time.deltaTime * 100f;

        // 移動処理は割愛

        var estimate = this.transform.position + this.velocity;
        var point = Vector2.zero;
        var normal = Vector2.zero;
        var distance = 0f;
        JumpFloodingManager.Get(estimate / 1024f, out point, out normal, out distance);
        point *= 1024f;
        distance *= 1024f;

        if (distance < radius)
        {
            // 押し返し
            this.transform.localPosition = point + normal * (radius + 1e-3f);

            // 再取得
            JumpFloodingManager.Get(this.transform.localPosition / 1024f, out point, out normal, out distance);

            // 反発
            const float e = 1.5f;
            Vector3 vn = Vector2.Dot(this.velocity, normal) * normal;
            this.velocity = this.velocity - vn * e;
        }
        else
        {
            this.transform.localPosition += this.velocity;
        }
    }
}
移動処理はthis.velocityの数値を変更することで移動させます。
途中1024で割ったり掛けたりしているのは、シーン上でマップを1024x1024を範囲としているからです。
テクスチャのサイズに合わせて、1pixel=1unitとなるよう実装していた流れでこのようになっています。
移動先のUV座標を算出し、母点のUV座標、法線、距離を取得します。
距離情報がプレイヤーの半径より小さい値ならば、衝突した状態となります。
衝突したら、母点の座標に移動し、法線情報を使ってプレイヤーの半径分押し出します。
この処理によって、地形にぶつかるようになります。
ここで反発処理を入れてみましたので、ざっくり解説します。
座標を移動したので、母点のUV座標、法線、距離を再取得します。
プレイヤーの移動方向(velocity)と法線で内積をとることで衝突した大きさを算出し、
その大きさ×法線で衝突物に向かう勢いを完全に殺すベクトル(vn)が算出できます。(アルファゲルに卵が落ちた時みたいな感じ)
this.velocity - vnで勢いを殺すのですが、vnを数倍にすることによって、反発させます。
プレイヤーを動かす(デバッグ表示)
OnDrawGizmosを使って、デバッグ表示したものが分かりやすいので、載せてみます。
#if UNITY_EDITOR
    private void OnDrawGizmos()
    {
        var estimate = this.transform.position + this.velocity;
        var point = Vector2.zero;
        var normal = Vector2.zero;
        var distance = 0f;
        JumpFloodingManager.Get(estimate / 1024f, out point, out normal, out distance);
        point *= 1024f;
        distance *= 1024f;

        using (new UnityEditor.Handles.DrawingScope(new Color(0.82f, 0.70f, 0.94f)))
        {
            UnityEngine.Gizmos.DrawWireSphere(point, 10f);
            UnityEditor.Handles.DrawWireDisc(this.transform.position, Vector3.forward, distance);
            if (0 < normal.magnitude)
                UnityEditor.Handles.Slider(point, normal);
        }
    }
#endif
ボムで地形を削る
ボムを投げて、マップ(地形)を削り取ります。
マップを削る処理
inputRTに変更を加えることで地形を削っていきます。
MapManager.csに削る関数を用意するので、追記分だけ記載していきます。
public class MapManager : MonoBehaviour
{
    private static readonly int ShaderParam_ScrapePoint = Shader.PropertyToID("_ScrapePoint");
    private static readonly int ShaderParam_ScrapeRadius = Shader.PropertyToID("_ScrapeRadius");

    [SerializeField]
    private Material material = default;

    public static void Scrape(Vector2 uv, float radius)
    {
        if (instance == null)
            return;

        instance.material.SetVector(ShaderParam_ScrapePoint, uv);
        instance.material.SetFloat(ShaderParam_ScrapeRadius, radius);

        var rt = instance.targetRenderTexture;
        rt = RenderTexture.GetTemporary(rt.width, rt.height, rt.depth, rt.format);
        Graphics.Blit(instance.targetRenderTexture, rt);
        Graphics.Blit(rt, instance.targetRenderTexture, instance.material, 0);
        RenderTexture.ReleaseTemporary(rt);
    }
GetTemporaryで一時的なRenderTexture(rt)を用意し、現在のマップの状況をBlit関数でそのままコピーします。
次に rt から inputRenderTexture に対してBlit関数で削る処理を施します。
実際に削る処理は次のシェーダーを使います。
float2 _ScrapePoint;
float _ScrapeRadius;

fixed4 frag(v2f i) : SV_Target
{
    fixed4 color = tex2D(_MainTex, i.uv);
    float dist = distance(i.uv, _ScrapePoint);
    return lerp(color, fixed4(0, 0, 0, 1), step(dist, _ScrapeRadius));
}
_ScrapePointからの距離が_ScrapeRadiusより小さかったら黒に塗りつぶす、という処理です。
ボムの移動制御
ボムの移動制御を実装していきます。
PlayerBomb.csを作成し、次のように実装します。
using UnityEngine;

public class PlayerBomb : MonoBehaviour
{
    public float radius = 1f;
    public Vector3 velocity = default;

    private void Update()
    {
        this.velocity.y -= 9.81f * 0.5f * Time.deltaTime * Time.deltaTime * 100f;

        var estimate = this.transform.position + this.velocity;
        var point = Vector2.zero;
        var distance = 0f;
        JumpFloodingManager.Get(estimate / 1024f, out point, out distance);
        distance *= 1024f;

        if (distance < radius)
        {
            // 爆発(マップを削り取る)
            const float ScrapeRadius = 25f;
            MapManager.Scrape(point, ScrapeRadius / 1024f);

            Destroy(this.gameObject);
        }
        else
        {
            this.transform.localPosition += this.velocity;
        }
    }
}
マップとの衝突判定はプレイヤーと全く同じものです。
衝突した場合は、先程実装したMapManager.Scrape関数を使って削ります。
ボムを投げる
プレイヤーがボムを投げれるようにします。
PlayerCtrl.csを次にように追記します。
if (Input.GetKeyDown(KeyCode.Z))
{
    var bombObject = GameObject.CreatePrimitive(PrimitiveType.Sphere);
    bombObject.name = "PlayerBomb";
    bombObject.transform.localPosition = this.transform.localPosition;
    bombObject.transform.localScale = Vector3.one * 10f;

    var bomb = bombObject.AddComponent<PlayerBomb>();
    bomb.velocity.x = Mathf.Sign(this.transform.forward.x);   // 右か左か
    bomb.velocity.y = 0.75f;
    bomb.velocity = bomb.velocity.normalized * 800f * 0.016f;
    bomb.radius = 1f;
}
地形を変形できるようになりました。
パーティクルを散らす
ボムが爆発した際に、パーティクルを散らしてみます。
折角RenderTexture上に情報が詰まっているので、GPUで多量の物体を制御したいと思います。
パーティクルの移動制御(C#)
CircleParticleManager.csを作成し、次のように実装します
using System.Collections.Generic;
using UnityEngine;

public class CircleParticleManager : MonoBehaviour
{
    private static CircleParticleManager instance;
    private const int ParticleCount = 1024;
    private static readonly int ShaderParam_Particles = Shader.PropertyToID("_Particles");
    private static readonly int ShaderParam_DeltaTime = Shader.PropertyToID("_DeltaTime");
    private static readonly int ShaderParam_OutputTexture = Shader.PropertyToID("_OutputTexture");
    private static readonly int ShaderParam_OutputNormalTexture  = Shader.PropertyToID("_OutputNormalTexture");

    private struct ParticleData
    {
        public float active;
        public float radius;
        public Vector2 position;
        public Vector2 velocity;

        static public int GetSize()
        {
            return sizeof(float) * 6;
        }
    }

    [SerializeField]
    private RenderTexture outputRenderTexture = default;

    [SerializeField]
    private RenderTexture outputNormalRenderTexture = default;

    [SerializeField]
    private ComputeShader shader = default;

    [SerializeField]
    private Mesh mesh = default;

    [SerializeField]
    private Material meshMaterial = default;

    private ParticleData[] data = default;
    private ComputeBuffer buffer = default;
    private ComputeBuffer argBuffer = default;
    private int kernelIndex = 0;
    private int activeIndex = 0;
    private RenderTexture tempRenderTexture = default;
    private RenderTexture tempNormalRenderTexture = default;


    private void Awake()    {    …    }

    void Start()
    {
        // 本来はoutputRenderTextureはJumpFloodingManagerのプログラム内で作成されるべき
        // 今回は面倒だったのでtemp(enableRandomWrite…UAVにして)にBlitします
        var rtDesc = new RenderTextureDescriptor()
        {
            width = this.outputRenderTexture.width,
            height = this.outputRenderTexture.height,
            depthBufferBits = this.outputRenderTexture.depth,
            volumeDepth = 1,
            msaaSamples = 1,
            dimension = UnityEngine.Rendering.TextureDimension.Tex2D,
            colorFormat = this.outputRenderTexture.format,
            autoGenerateMips = false,
            useMipMap = false,
            mipCount = 1,
            graphicsFormat = this.outputRenderTexture.graphicsFormat,
            memoryless = this.outputRenderTexture.memorylessMode,
            enableRandomWrite = true,
        };
        this.tempRenderTexture = new RenderTexture(rtDesc);
        this.tempNormalRenderTexture = new RenderTexture(rtDesc);

        this.data = new ParticleData[ParticleCount];
        this.buffer = new ComputeBuffer(ParticleCount, ParticleData.GetSize(), ComputeBufferType.Structured);
        this.buffer.SetData(this.data);
        this.kernelIndex = this.shader.FindKernel("CSUpdate");
        this.shader.SetBuffer(this.kernelIndex, ShaderParam_Particles, this.buffer);
        this.shader.SetTexture(this.kernelIndex, ShaderParam_OutputTexture, this.tempRenderTexture);
        this.shader.SetTexture(this.kernelIndex, ShaderParam_OutputNormalTexture, this.tempNormalRenderTexture);

        var arg = new uint[5] {
            (uint)this.mesh.GetIndexCount(0),
            (uint)ParticleCount,
            (uint)this.mesh.GetIndexStart(0),
            (uint)this.mesh.GetBaseVertex(0),
            0,
        };
        this.argBuffer = new ComputeBuffer(1, sizeof(uint) * arg.Length, ComputeBufferType.IndirectArguments);
        this.argBuffer.SetData(arg);
    }

    private void OnDestroy()    {    …    }

    private void Update()
    {
        // 本来はoutputRenderTextureはJumpFloodingManagerのプログラム内で作成されるべき
        // 今回は面倒だったのでtemp(enableRandomWrite…UAVにして)にBlitします
        Graphics.Blit(this.outputRenderTexture, this.tempRenderTexture);
        Graphics.Blit(this.outputNormalRenderTexture, this.tempNormalRenderTexture);

        this.shader.SetTexture(this.kernelIndex, ShaderParam_OutputTexture, this.tempRenderTexture);
        this.shader.SetTexture(this.kernelIndex, ShaderParam_OutputNormalTexture, this.tempNormalRenderTexture);

        this.shader.SetFloat(ShaderParam_DeltaTime, Time.deltaTime);
        this.shader.Dispatch(this.kernelIndex, Mathf.CeilToInt(ParticleCount / 128), 1, 1);

        this.meshMaterial.SetBuffer("_ParticleData", this.buffer);
        Graphics.DrawMeshInstancedIndirect(this.mesh, 0, this.meshMaterial, new Bounds(Vector3.one * 512f, Vector3.one * 1024f), this.argBuffer);
    }

    static public void Emit(Vector2 [] positions, Vector2 [] velocities)
    {
        if (instance == null)
            return;

        instance.buffer.GetData(instance.data, 0, 0, instance.data.Length);

        for (int i = 0; i < positions.Length; ++i)
        {
            int idx = (instance.activeIndex + i) % ParticleCount;
            instance.data[idx] = new ParticleData() {
                active = 1f,
                radius = 2.5f,
                position = positions[i],
                velocity = velocities[i],
            };
        }

        instance.buffer.SetData(instance.data);
        instance.activeIndex += positions.Length;
        instance.activeIndex %= ParticleCount;
    }
}
ComputeShaderを使ってパーティクルの移動制御を行っていきます。
Graphics.DrawMeshInstancedIndirect関数を用いて、多量のパーティクルをインスタンシング描画しています。
この後ComputeShaderの実装を解説していきますが、
次のトラップがあったのでC#側でちょっと面倒なことになっています。
- ComputeShader内ではtex2D関数は使えない
- ComputeShader内でSampleLevel関数を使う場合は、RenderTextureのenableRandomWriteをonにしないとダメ
今回 outputRT と outputNormalRT はUnity上でアセットとして作成したものを使用しており、
enableRandomWrite のフラグはC#上で作成したRTのみ設定可能ということだったので、
CircleParticleManager でほぼ同じ内容のRTを作成しています(tempRenderTexture、tempNormalRenderTexture)。
無駄なことしていますが、直す元気と時間がなかったのでご了承ください。
パーティクルの移動制御(Shader)
引き続きまして、コンピュートシェーダーを実装していきます
#pragma kernel CSUpdate

struct ParticleData
{
	float active;
	float radius;
	float2 position;
	float2 velocity;
};

Texture2D<float4> _OutputTexture;
SamplerState sampler_OutputTexture;
Texture2D<float4> _OutputNormalTexture;
SamplerState sampler_OutputNormalTexture;

RWStructuredBuffer<ParticleData> _Particles;
float _DeltaTime;

[numthreads(128, 1, 1)]
void CSUpdate(uint3 id : SV_DispatchThreadID)
{
	ParticleData data = _Particles[id.x];

	if (data.active <= 0.0)
		return;

	data.velocity.y -= 9.81 * 0.5 * _DeltaTime * _DeltaTime * 100;

	float2 estimate = data.position + data.velocity;
	float2 uv = estimate / 1024.0;
	uv = saturate(uv);
	uv.y = 1.0 - uv.y;

	float4 output = _OutputTexture.SampleLevel(sampler_OutputTexture, uv, 0.0);
	output.a = step(0.5, output.a);
	float2 seed = output.rg;
	float into = sign(-(output.a * 2.0 - 1.0));
	float dist = distance(uv, seed) * into;

	if (dist <= data.radius / 1024.0)
	{
		// 押し返し
		float2 normal = float2(0, 0);
		normal = _OutputNormalTexture.SampleLevel(sampler_OutputNormalTexture, uv, 0.0).xy;
		normal = normal * 2.0 - 1.0;
		normal *= into;

		data.position = seed + normal * (data.radius / 1024.0);
		uv = data.position;
		uv = saturate(uv);
		uv.y = 1.0 - uv.y;
		data.position *= 1024.0;

		// 再取得
		output = _OutputTexture.SampleLevel(sampler_OutputTexture, uv, 0.0);
		output.a = step(0.5, output.a);
		seed = output.rg;
		into = sign(-(output.a * 2.0 - 1.0));
		dist = distance(uv, seed) * into;
		normal = _OutputNormalTexture.SampleLevel(sampler_OutputNormalTexture, uv, 0.0).xy;
		normal = normal * 2.0 - 1.0;
		normal *= into;

		// 反発
		float2 vn = dot(data.velocity, normal) * normal;
		data.velocity = data.velocity - vn * 1.5;

		// TODO: seed=0,0になる不具合がある
		data.active = step(1e-2, distance(float2(0, 0), data.position));
		data.active *= step(1e-2, length(data.velocity));
	}
	else
	{
		data.position = estimate;
	}

	_Particles[id.x] = data;
}
処理している内容はプレイヤーの動きと全く同じです(this.velocity.xの減衰がなくなったくらい)。
ここでちょっと申し訳ないのですが、衝突時に反発せず消滅する不具合が生じており、今もまだ残っている状態です。
結構楽しかったので、そのうち不具合の修正をするかもしれないですが、
今回はこの不具合+velocityの勢いが小さくなった場合に消滅するように実装しています。
ボムの消滅時にパーティクルを発生させる
先程のボム(PlayerBomb.cs)に追記していきます。
if (distance < radius)
{
    // 雑なエフェクト
    var position = this.transform.localPosition;
    var positions = new Vector2[100];
    var velocities = new Vector2[100];
    for (int i = 0; i < 100; ++i)
    {
        positions[i] = position;
        positions[i].x += Random.Range(-ScrapeRadius, ScrapeRadius);
        positions[i].y += Random.Range(-ScrapeRadius, ScrapeRadius);
        float euler = Random.Range(0f, Mathf.PI * 2f);
        velocities[i] = new Vector2(Mathf.Sin(euler), Mathf.Cos(euler));
        velocities[i] *= 2.0f;
    }
    CircleParticleManager.Emit(positions, velocities);
}
エネルギーを使い果たしたので、本記事はここまでになります!
最後まで読んでいただいてありがとうございます!!
まとめ
いかがでしたでしょうか?
JFAを使って距離情報を高速に作成することが出来るという記事でした。
(ReadPixels関数のところで相当重くなってますが…)
C#上で母点の情報を得るところに関しては、改良が必要になりそうですが、
この様な感じでゲームを作ることもできそうですね。
余談
ちょっとアサルトギアに似てるな…と思いました。
今回これをテーマに選んだ理由
一昨年のアドカレの時に、UnityでImposterというテクニックを試していました。
その時はΑ値でフェードイン/フェードアウトさせていたのですが、
JFAで作ったSDFを利用してフェードイン/フェードアウトをより綺麗になるらしく、
そこまで記事に出来なかったので、今回挑戦してみた…というところでした。
coposuke.hateblo.jp
ShaderToy
JFAを使ったShaderToyの作品もあるので、よろしかったら是非ご覧ください!
www.shadertoy.com
参考資料
明日
明日は @saragai さんの「【Unity】滲みにこだわるブラウン管シェーダ」記事です!
ブラウン管をシェーダーで表現するのは、とても奥が深そうですね。